Welcome to the Mulligans Pharmacy blog, where you'll find everything you need to live a happier, healthier and longer life! You'll also find the latest news on new launches and learn some tips and tricks from our expert cosmetics teams!
Jimmy Coco is the man behind the gorgeous tans of the Kardashians, Jenners, Gigi Hadid, Heidi Klum and more and she’s just spilled her top tanning tip to get a gorgeous tan!
Can you guess what it is?
Exfoliation!
He’s a huge believer in scrubbing away old tan and skin cells before applying a fresh layer of tan – but he says dry exfoliating is the way to go!
“Scrubs and soaps create a barrier on your skin that creates uneven, streaky, blotchy results”
“Your tan can’t get in and do its job if you have any residue on the skin”
“I have always told my clients that you need to exfoliate after the shower”
This removes any residue from whatever products you used in the shower as well as the top layer of skin.
He recommends using a soft washcloth or body brush to remove dry skin and old tan!
So what do you think, would you try this out? Let us know in the comments!
Whether you’re a seasoned pro or have never applied false tan, it can sometimes be a daunting task! Will it be even? Is it the right shade? There are so many worries that you can face when applying false tan.
We’ve put together this helpful list to see you through any #TanningThursday!
1.Plan Ahead
Self tanning isn’t something you do on a whim! Although spontaneity is a great personality trait, lets not risk it when it comes to false tan! Be ready, set aside a few hours and get ready. Remember never skip preparation!
2.Exfoliate
The day before you tan, make sure to exfoliate the skin to remove dry, flaky dead skin cells. If you don’t exfoliate properly, you may end up with streaks and dark patches. Take time and scrub your entire body, be sure to take extra time and focus on your knees, elbows, ankles and any other areas with dry patches.
3.Moisturise
Before applying self tan, you should shower, towel dry and apply a light moisturiser or lotion to your elbows and knees since they tend to grab more colour than other areas. Avoid applying lotion all over the body as oils don’t mix well with false tan.
4.Use The Right Mitt
Using the right application mitt is essential if you want to avoid the streaky look. We recommend using a double sided velvet mitt to make application easier.
5.Give Yourself Time
Take your time! Applying false tan is something that shouldn’t be rushed. If possible apply false tan during the day time in natural light with a full length mirror.
6.Apply In Circular Motions
Apply small amounts of the self tan in circular motions. Don’t move on to a new area until the current area is complete.
7.Avoid!
Avoid applying false tan to the bottoms of your feet and to the palms of your hands (It rarely ends well). Alternatively mix some of your false tan with some lotion to apply to the tops of your hands once your body is finished and you remove your gloves.
8.Less Is More
If you are using a gradual tanner then you won’t see results for hours, you can always reapply two to three days later instead of going overboard all at once!
9.Blend
If you need to remove any false tan, use a non-oil based scrub and gently blend the scrub on the area you’d like to lighten and then remove with a damp wash cloth.
10.Wait
Try not to shower straight away, allow yourself time for your tan to develop. Remember to wear loose fitting clothes and avoid exercising/sweating. By the next day you should have a beautiful sun kissed glow!
To find your perfect self tan or to chat to our expert beauty team on what tan suits your skin type, call to your nearest Mulligans Pharmacy!
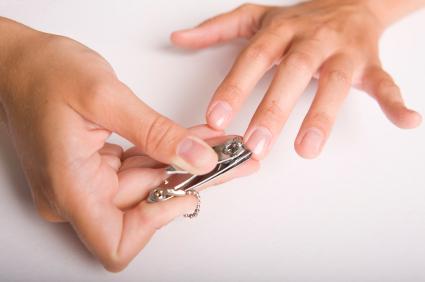
When applying fake tan, we would ALWAYS recommend that you prepare your skin appropriately, apply tan with a self tanning mitt AND to apply a clear base coat to your nails. However sometimes you don’t have the time the night before to apply get ready and apply tan. Once of the consequences of a rushed tan job however is the orange stained nails you can get.
If you’re caught in a rush and need a quick tan, keep your nails in tip top shape with these easy steps!
What To Do
Fill a basin with hot soapy water and soak your nails for 10 minutes
Use a Cuticle Trimmer to remove dead stained skin from the base of your nails
Using the same basin, empty it and refill it with warm water and some drops of Tea Tree Oil
Swirl your hands in the oil/water mix for a few minutes
Using a toothbrush scrub your nails, including the underside
Soak some cotton wool in some lemon juice then rub it on each nail
Finally wash your hands with warm water and apply hand cream
This will only take 20 minutes but correct removal will ensure your nails aren’t weakened or damaged.
If you’re a tan lover, then you’ve definitely heard of Tan Organic, it is an Irish owned tan company, that only produces Eco-Certified Organic products! All of their products are created with all skin types in mind, however it is particularly suited for sensitive skin.
The Tan Organic range has a variety of products in its range such as; The World’s First Self Tan Oil, Self Tan Lotion, Moisturising Multi Use Dry Oil, Moisturising Facial Tan Oil, Moisturising Facial Serum, the Tan Organic Duo Bronzer, their Tan Erase Ultimate Exfoliator Glove and their Self Tan Application Mitt!
Tan Organic is the ‘go to’ tan for many bloggers and influencers, such as Roasanna Davison (who is also their fabulous Brand Ambassador)
<p style=” margin:8px 0 0 0; padding:0 4px;”> <a href=”https://www.instagram.com/p/BZar834h_yk/” style=” color:#000; font-family:Arial,sans-serif; font-size:14px; font-style:normal; font-weight:normal; line-height:17px; text-decoration:none; word-wrap:break-word;” target=”_blank”>Good girls fake it 😝 I love a golden glow & have been keeping my tan topped up all week with my fave @tanorganicofficial self tan mousse 🌞👙🌴 . . . . #tanorganic #organicskincare #organic #sp #brandambassador</a></p> <p style=” color:#c9c8cd; font-family:Arial,sans-serif; font-size:14px; line-height:17px; margin-bottom:0; margin-top:8px; overflow:hidden; padding:8px 0 7px; text-align:center; text-overflow:ellipsis; white-space:nowrap;”>A post shared by ✨ Rosanna Davison ✨ (@rosanna_davison) on <time style=” font-family:Arial,sans-serif; font-size:14px; line-height:17px;” datetime=”2017-09-24T08:25:24+00:00″>Sep 24, 2017 at 1:25am PDT</time></p></div></blockquote> //platform.instagram.com/en_US/embeds.js
Tan Organic is also easy to apply and smells amazing too! Check out our videos below to see how to get the most from your application!
Tan Organic: How To Apply
Step 1: Exfoliate Using The Tan Erase Ultimate Exfoliator Glove
As with all sunless tans, preparation is key, exfoliate your entire body, paying close attention to trouble areas such as the knees, ankles and elbows where skin is drier. Our award winning Tan Erase is the ideal tool as it can be used wet or dry. Make sure your skin is clean and polished before you move to the next step.
Step 2: Prep Skin With The Moisturising Multi-Use Dry Oil
Once you have finished exfoliating, moisturize! This is another key factor to achieving a flawless tan and perfect fade. Our 100% natural multi award winning Oil Arganic is the ideal accompaniment to TanOrganic and will leave your skin super smooth and supple. Be sure to pay close attention and only apply the oil to the knees, elbows, hands and feet as Multi-Use Dry Oil will act as a buffer against skin cells and ensure that you never end up with disastrous application results like tangoed hands and feet. Body Oils are an essential part of retaining your skins natural beauty and differ to traditional moisturisers as they contain no water so it is instantly absorbed into your skin.
Step 3: Self Tan Lotion
Now you are ready to apply your tan, remember LESS IS MORE with TanOrganic, each bottle will do on average 5 – 7 full body tans. Apply a few drops, about the size of a euro coin to the luxury glove and make a fist about 3 times to allow the glove to absorb the tan.
Start on your legs but leave your hands and feet until the end. Apply in circular motions starting on your calves and working your way up to your thighs, make sure you cover all areas, pay special attention to the knees and ankles and ensure that there is no build up in the creases. Remember to check hard to reach areas in a mirror so that nothing is missed – along the backs of the legs can be a common streak area. Allow the tan to dry and if you have missed any areas, you can easily blend in any lines.
Next move to your midriff and apply in the same fashion. Reach around to apply to your back or if possible get a friend or partner to do it for you to ensure an even streak free tan. Even the men in our lives don’t mind applying TanOrganic, as there is no overpowering fake tan smell that we associate with other fake tans.
Next move to the arms and in the same fashion as the legs, apply the tan in circular motions along the back of the arms and over the shoulders. Apply most of the tan to the outside of the arms and leave the left over for the insides; this will give you a natural looking tan but pay particular attention to the elbows and do not use too much tan as it will build up and this is a tell tale sign of a bad tan. Now you can work on your hands and feet; using the left over tan on the glove, apply the tan ensuring you run between the fingers and toes – do not apply to the palms of your hands or soles of your feet. Make sure there is no build up and when you are done, wipe the palms of your hands, fingernails and toenails with a baby wipe.
Moving finally to the face and neck, we recommend that you use our amazing self-tanning oil for the face and neck. This was recently voted best facial tanner by RSVP magazine. There is no need to use a glove, simply apply some to your hands and apply like any other facial oil. When you are finished, wipe your palms and nails with a baby wipe.
When you are finished, check in a mirror for any lines that may not have been blended in. If you find any lines, just add a bit of Oil Arganic to the glove and blend them in. TanOrganic should be applied in light layers, do the first layer and let it dry for a couple of minutes, if you are looking for a darker look, apply a second or third layer.
TanOrganic takes 6 to 8 hours to develop fully but its best to leave it overnight – the tan will develop every hour after application up to 8 hours. When trying TanOrganic for the first time, try out 1, 2 and 3 layer applications to determine which shade you prefer. You may prefer one layer for daytime and 2 or 3 for evening.
Step 4: Self Tan Oil
TanOrganic self-tanning oil is a world’s first as it’s a body oil that gives a subtle tan. It’s lighter than our core product but darker than usual gradual tanners. It is ideal for those who prefer a natural glow and is the perfect facial tan recently winning the best facial tanner by RSVP magazine and best tanning oil by Social & Personal.
You apply TanOrganic self-tanning oil like any other body oil without the need for a glove. It is perfect for application after a shower or after the gym.
To get the best possible finish, preparation is important; exfoliate your entire body, paying close attention to trouble areas such as the knees, ankles and elbows where skin is drier. Our award winning Tan Erase is the ideal tool as it can be used wet or dry.
Application couldn’t be easier; you apply a little to the skin as you would any other body oil and massage it in. You DO NOT need to use a glove. TanOrganic’s self-tanning oil does not contain a colour guide so it’s important to cover all areas and make sure you don’t leave any gaps for a streak free tan. Again, it’s advisable to ask for assistance from a partner of friend to get to the hard to reach areas. Play and practice a little with this application and once you have mastered it, we promise you will love the results.
When you are finished, simply remove any excess by wiping the palms of your hands, fingernails and toenails with a baby wipe. TanOrganic’s self-tanning oil takes about 6-8 hours to develop and if you prefer a darker shade, apply another coat to suit your needs. If you like an all year round glow, reapply every 3 – 4 days as desired.